零、准备
一、新建SquareLine工程并导出模板工程
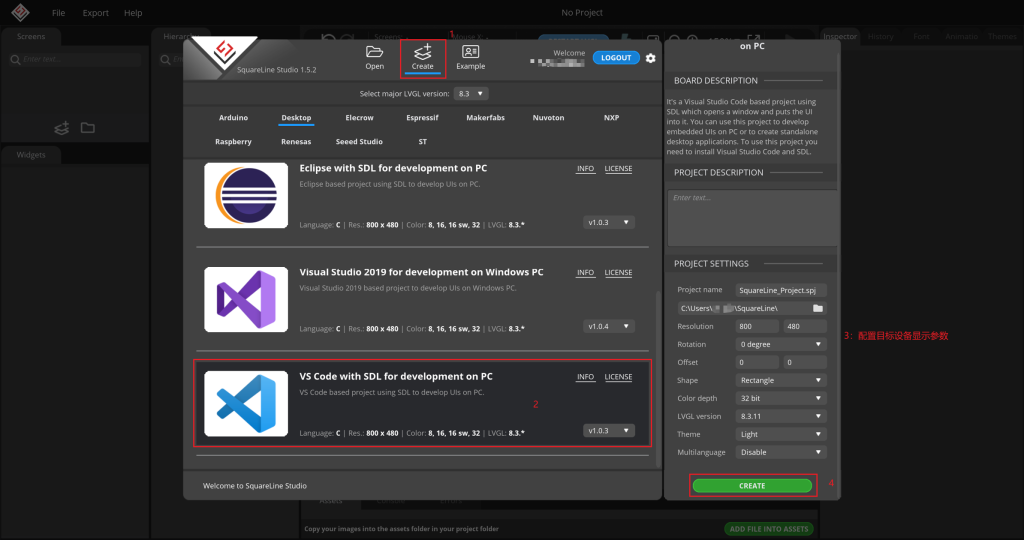
打开SquareLine Studio,选择VSCode with SDL for development on PC,然后配置好目标设备的参数,新建工程即可。
新建完成后,我们简单的拉两个控件用于测试,建议选择一个可以交互的控件。

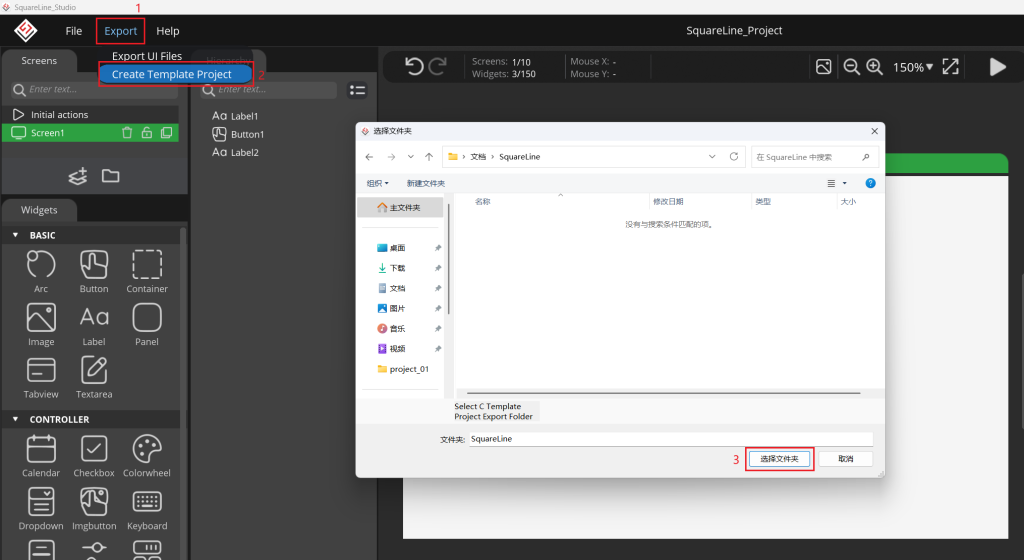
接下来,我们需要导出一个样板工程。选择Export->Create Template Project,然后指定自己想导出的项目文件夹导出。
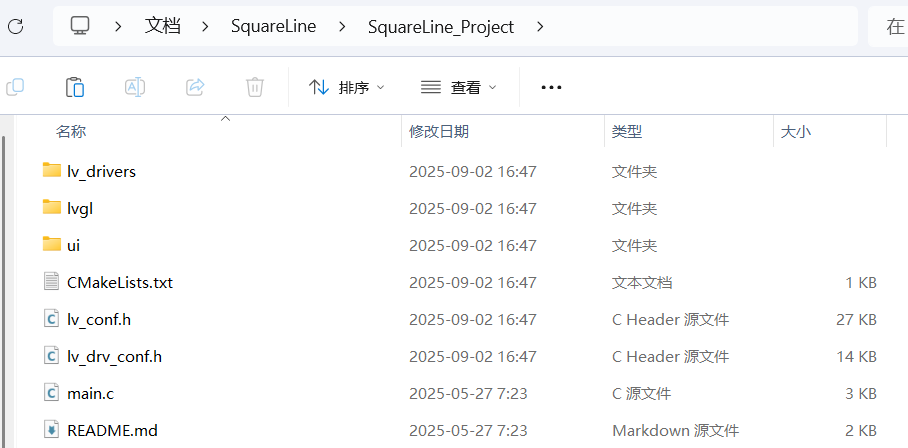
导出完成后,可以在导出文件夹下看到模板工程:
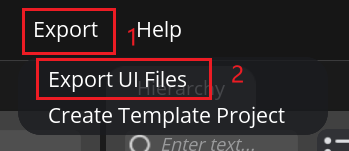
然后,再导出ui文件至模板工程文件夹下。
至此,准备工作已经完成。
二、关闭模板工程中的SDL支持
在第一步中我们选择的选项默认开启了SDL支持,这会让LVGL将画面输出至LVGL模拟器。我们需要运行在Linux设备上,因此需要关闭它。
1、在main.c中注释SDL相关内容:
// #include <SDL2/SDL.h>
// #include "lv_drivers/sdl/sdl.h"

/**********************
 *  STATIC PROTOTYPES
 **********************/
static void hal_init(void);

int main(int argc, char **argv)
{
  (void)argc; /*Unused*/
  (void)argv; /*Unused*/

  /*Initialize LVGL*/
  lv_init();

  /*Initialize the HAL (display, input devices, tick) for LVGL*/
  // hal_init();

  ui_init();

  while(1) {
      /* Periodically call the lv_task handler.
       * It could be done in a timer interrupt or an OS task too.*/
      lv_timer_handler();
      usleep(5 * 1000);
  }

  return 0;
}

// static void hal_init(void)
// {
//   /* Use the 'monitor' driver which creates window on PC's monitor to simulate a display*/
//   sdl_init();

//   /*Create a display buffer*/
//   static lv_color_t buf[SDL_HOR_RES * SDL_VER_RES];
//   static lv_disp_draw_buf_t disp_draw_buf;
//   lv_disp_draw_buf_init(&disp_draw_buf, buf, NULL, SDL_HOR_RES * SDL_VER_RES);

//   /*Create a display*/
//   static lv_disp_drv_t disp_drv;
//   lv_disp_drv_init(&disp_drv); /*Basic initialization*/
//   disp_drv.draw_buf = &disp_draw_buf;
//   disp_drv.flush_cb = sdl_display_flush;
//   disp_drv.hor_res = SDL_HOR_RES;
//   disp_drv.ver_res = SDL_VER_RES;
//   lv_disp_drv_register(&disp_drv);

//   /* Add a mouse as input device */
//   static lv_indev_drv_t indev_drv;
//   lv_indev_drv_init(&indev_drv); /*Basic initialization*/
//   indev_drv.type = LV_INDEV_TYPE_POINTER;
//   indev_drv.read_cb = sdl_mouse_read;
//   lv_indev_drv_register(&indev_drv);
// }2、修改lv_conf.h
将LV_TICK_CUSTOM的值改为0
#define LV_TICK_CUSTOM 03、修改lv_drv_conf.h
将USE_SDL的值改为0
# define USE_SDL 0注释SDL头文件:
// # define SDL_INCLUDE_PATH <SDL2/SDL.h>4、修改CMakeLists.txt,移除SDL相关代码
cmake_minimum_required(VERSION 3.10)

project(SquareLine_Project C)

set(CMAKE_C_STANDARD 11)
set(CMAKE_CXX_STANDARD 11)
set( CMAKE_C_FLAGS "-Wall -Wextra -Wno-unused -g" )
set( CMAKE_CXX_FLAGS "-Wall -Wextra -Wno-unused -g" )

# find_package(SDL2 REQUIRED SDL2)
include_directories(
    # ${SDL2_INCLUDE_DIRS}
    # ${SDL2_INCLUDE_DIRS}/../
    ${PROJECT_SOURCE_DIR}
    ${PROJECT_SOURCE_DIR}/lvgl
    ${PROJECT_SOURCE_DIR}/lv_drivers
    ${PROJECT_SOURCE_DIR}/ui
)

FILE(GLOB_RECURSE LVGL_Sources CONFIGURE_DEPENDS lvgl/*.c)
FILE(GLOB_RECURSE LV_DRIVERS_Sources CONFIGURE_DEPENDS lv_drivers/*.c)
FILE(GLOB_RECURSE UI_Sources CONFIGURE_DEPENDS ui/*.c ui/*.cpp)

add_executable(${PROJECT_NAME} main.c ${LVGL_Sources} ${LV_DRIVERS_Sources} ${UI_Sources})

#string(STRIP ${SDL2_LIBRARIES} SDL2_LIBRARIES)

# target_link_libraries(${PROJECT_NAME} PRIVATE ${SDL2_LIBRARIES})
三、添加目标开发板的交叉编译器
在Project目录新建一个文件toolchain-arm.cmake
set(CMAKE_SYSTEM_NAME Linux)
set(CMAKE_SYSTEM_PROCESSOR arm)
# 交叉编译器前缀
set(CROSS_COMPILE /到编译器的目录/arm-none-linux-gnueabihf)

# 指定编译器
set(CMAKE_C_COMPILER   ${CROSS_COMPILE}-gcc)
set(CMAKE_CXX_COMPILER ${CROSS_COMPILE}-g++)
然后进入build目录,使用cmake生成Makefile
mkdir build && cd build
cmake .. -DCMAKE_TOOLCHAIN_FILE=../toolchain-arm.cmake
生成完成后,尝试编译
make编译成功后,build目录下会生成目标文件SquareLine_Project
四、打开linuxfb输出支持
我们使用linuxfb输出图形界面,需要打开LVGL的buffer输出支持
1、打开buffer输出支持,将lv_drv_conf.h中的USE_FBDEV改为1
/*-----------------------------------------
 *  Linux frame buffer device (/dev/fbx)
 *-----------------------------------------*/
#ifndef USE_FBDEV
#  define USE_FBDEV           1
#endif

#if USE_FBDEV
#  define FBDEV_PATH          "/dev/fb0"
#endif
2、初始化屏幕,修改main.c
/*Initialize the HAL (display, input devices, tick) for LVGL*/
fbdev_init();

/*Create a display buffer*/
static lv_color_t buf[800 * 480];
static lv_disp_draw_buf_t disp_draw_buf;
lv_disp_draw_buf_init(&disp_draw_buf, buf, NULL, 800 * 480);

/*Create a display*/
static lv_disp_drv_t disp_drv;
lv_disp_drv_init(&disp_drv); /*Basic initialization*/
disp_drv.draw_buf = &disp_draw_buf;
disp_drv.flush_cb = fbdev_flush;
disp_drv.hor_res = 800;  // 更改为实际分辨率
disp_drv.ver_res = 480;
lv_disp_drv_register(&disp_drv);
还需要再添加头文件:
#include "lv_drivers/display/fbdev.h"3、添加自定义tick函数
在main.c中添加tick函数的定义:
#include <sys/time.h>
uint32_t custom_tick_get(void)
{
    static uint64_t start_ms = 0;
    if(start_ms == 0) {
        struct timeval tv_start;
        gettimeofday(&tv_start, NULL);
        start_ms = (tv_start.tv_sec * 1000000 + tv_start.tv_usec) / 1000;
    }

    struct timeval tv_now;
    gettimeofday(&tv_now, NULL);
    uint64_t now_ms;
    now_ms = (tv_now.tv_sec * 1000000 + tv_now.tv_usec) / 1000;

    uint32_t time_ms = now_ms - start_ms;
    return time_ms;
}
然后在lv_conf.h中应用,将LV_TICK_CUSTOM改为1,并将刚刚自定义的函数写进来:
#define LV_TICK_CUSTOM 1
#if LV_TICK_CUSTOM
    #define LV_TICK_CUSTOM_INCLUDE <stdint.h>        /*Header for the system time function*/
    #define LV_TICK_CUSTOM_SYS_TIME_EXPR (custom_tick_get())    /*Expression evaluating to current system time in ms*/
#endif   /*LV_TICK_CUSTOM*/
五、打开触摸驱动
我们使用LVGL自带的libinput作为触摸驱动
1、在lv_drv_conf.h中把USE_LIBINPUT设置为1:
/*-------------------------------------------------
 * Touchscreen, mouse/touchpad or keyboard as libinput interface (for Linux based systems)
 *------------------------------------------------*/
#ifndef USE_LIBINPUT
#  define USE_LIBINPUT           1
#endif2、在main.c中注册触摸驱动
/* 初始化触摸 */
libinput_init();
lv_indev_drv_t indev_drv;
lv_indev_drv_init(&indev_drv);
indev_drv.type = LV_INDEV_TYPE_POINTER;
indev_drv.read_cb = libinput_read;
lv_indev_t *my_indev = lv_indev_drv_register(&indev_drv);
3、在编译器中加入libinput库
4、编译并烧录
六、去除终端光标
默认情况下,打开LVGL画面后会发现左下角有终端光标在闪烁,我们需要将其去除
1、新建隐藏光标的函数
#include <fcntl.h>
void hide_terminal_cursor(void) {
    int fd = open("/dev/tty1", O_WRONLY);
    if(fd >= 0) {
        write(fd, "\e[?25l", 6);  // 隐藏光标
        close(fd);
    }
}
2、在主函数中调用
while(1) {
    hide_terminal_cursor();
      /* Periodically call the lv_task handler.
       * It could be done in a timer interrupt or an OS task too.*/
      lv_timer_handler();
      usleep(5 * 1000);
  }
3、编译并烧录
七、去除终端输出
如果此时直接运行,会发现终端会输出dmesg的内容,并且刷新掉了我们的图形界面,因此我们需要将该输出屏蔽。
echo 0 > /sys/class/vtconsole/vtcon0/bind
echo 0 > /sys/class/vtconsole/vtcon1/bind
附Cmakelist
cmake_minimum_required(VERSION 3.10)

project(SquareLine_Project C)

# 设置sysroot路径
set(SYSROOT_PATH "/home/anysets/Luckfox-SDK/buildroot/output/rockchip_rk3506_luckfox/host/arm-buildroot-linux-gnueabihf/sysroot")

set(CMAKE_C_STANDARD 11)
set(CMAKE_CXX_STANDARD 11)
set( CMAKE_C_FLAGS "--sysroot=${SYSROOT_PATH} -Wall -Wextra -Wno-unused -g" )
set( CMAKE_CXX_FLAGS "--sysroot=${SYSROOT_PATH} -Wall -Wextra -Wno-unused -g" )
set(CMAKE_EXE_LINKER_FLAGS "--sysroot=${SYSROOT_PATH}")

# 指定库搜索目录
link_directories(
    # ${SYSROOT_PATH}/usr/lib
    ${SYSROOT_PATH}/lib
)

# find_package(SDL2 REQUIRED SDL2)
include_directories(
    # ${SDL2_INCLUDE_DIRS}
    # ${SDL2_INCLUDE_DIRS}/../
    ${PROJECT_SOURCE_DIR}
    ${PROJECT_SOURCE_DIR}/lvgl
    ${PROJECT_SOURCE_DIR}/lv_drivers
    ${PROJECT_SOURCE_DIR}/ui
    ${SYSROOT_PATH}/usr/include
)

FILE(GLOB_RECURSE LVGL_Sources CONFIGURE_DEPENDS lvgl/*.c)
FILE(GLOB_RECURSE LV_DRIVERS_Sources CONFIGURE_DEPENDS lv_drivers/*.c)
FILE(GLOB_RECURSE UI_Sources CONFIGURE_DEPENDS ui/*.c ui/*.cpp)

add_executable(${PROJECT_NAME} main.c ${LVGL_Sources} ${LV_DRIVERS_Sources} ${UI_Sources})

# 链接库 (相当于 -linput)
target_link_libraries(${PROJECT_NAME} PRIVATE
    input
    pthread
    m
)

#string(STRIP ${SDL2_LIBRARIES} SDL2_LIBRARIES)

# target_link_libraries(${PROJECT_NAME} PRIVATE ${SDL2_LIBRARIES})